I love Kwik Stix and so do my students. “It’s like drawing with lipstick!” I posted a video review of the product because I liked them so much. Then, the Kwik Stix company saw it and contacted me about trying out their metallic and neon colors. I tried them out to share with you and I also came up with a fun project you could try using them. (Disclosure: I received these as a gift from the company. I am not being paid to review the product, but Amazon Affiliate links are used in this post.)
 The Metalix are on the left and the Neons are on the right. They are available for purchase at Target stores and Target.com. Kwik Stix are solid tempera paint sticks that dry in 90 seconds. They are non-toxic and easy to clean up. You do not need water or paint brushes! The company says they work beautifully on paper, wood, canvas, cardboard and other crafting mediums. I have been enjoying my regular Kwik Stix so it is nice to have the extra color options. Let’s talk about the Metallix first. When colored on a white piece of paper they have a subtle shimmer. The shimmer is more seen on a black piece of paper, but it is still subtle and you can see the shimmer better when you look at it from an angle. I think these are better used as an accent on black paper rather than a full picture totally with them, because they are not super vibrant. But, I do really like the gold, silver and the pink colors the best!

The Neon colors are fun too. The colors are pretty. The yellow and orange are not as bright neon-ish as they could be, but they are still pretty colors. The pink and purple are quite vibrant and neon. The blue I would not say is very neon. But that being said, I will still buy these colors for my classes.

My friend Katie, who write the Adventures of an Art Teacher blog, also reviewed the Kwik Stix and she shared a brilliant use of them. They can be used on styrofoam printing plates instead of ink! Total game changer. So easy!
 So here is the art project I made with my Kwik Stix and watercolors.
Products Used:
- Kwik Stix: Metallic, Regular and Neon
- Faber Castell watercolor paints
- Pencil
- Black Sharpie marker
- Bulletin board letters
1. Start by choosing letters to trace. You can use stencils or bulletin board letters. Write a word, phrase or your name!

2. Trace the letters carefully on your page.

3. After tracing your letters, add extra designs if you wish. Trace over the letters with a black Sharpie marker.

4. Next, use the Kwik Stix to color in the letters.

5. You can leave your picture as it is or paint the background with watercolors. I love the Faber Castell watercolors.

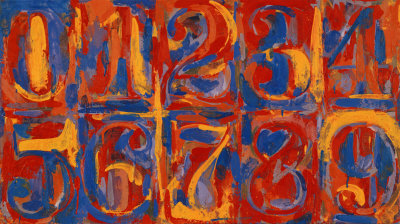
And there you have it! This is a great lesson to tie in with Jasper John’s artwork.

Jasper Johns
I did a very similar lesson with my first graders and I showed them a Powerpoint about Jasper John’s letter and number paintings. I used a Powerpoint from Art Corps and then I added a few pictures to it. Here is the PPT I used:

Jasper Johns
Have you used Kwik Stix before? What do you think?
Have you made art inspired by Jasper Johns?
Discover more from Art is Basic | Elementary Art Ideas
Subscribe to get the latest posts sent to your email.


Geez these kwik stix are taking the kids art world by storm! (Accept we have been using Faber Castells version for years;) Especially the metallics!) Lol! We live in small town & have just finally yesterday found these first time! $17.00CDN! Crazy! But haven’t yet seen the Metallics nor the Neons. Lucky guys you are. I absolutely love your power point lesson–so simple! I would totally love to use these w my Grade 2’s at home, with Christmas colour schemes. Thanks